
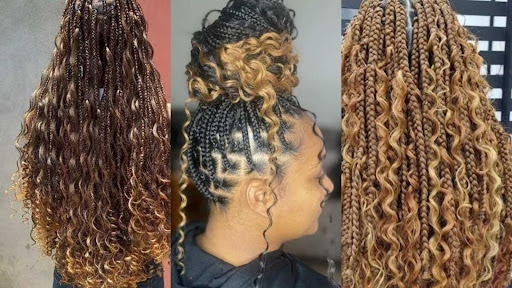
Goddess box braids are somewhat similar to box braids, with curly hair strands throughout the braids and or at the ends. You can get these braids with various variations, either long and voluminous ones or ones that stay up and out of your face. In this guide, we will overview different aspects of goddess box braids. We will also share exclusive discount codes for up to 30% off on your next premium colorful wigs shopping. So, keep reading until the end.
Are Goddess Braids a Good Protective Style?
Like any other protective hairstyle, goddess braids also help protect hair from heat or external damage and improve overall hair growth with reduced styling and manipulation. Moreover, these braids are larger than other traditional ones, so they evenly distribute the weight across the scalp. This will help reduce tension on the scalp and avoid scalp-related concerns.

Though goddess braids take longer, around six hours to install, the results are surely worth it. These braids will last up to eight weeks, depending on your hair texture, porosity, maintenance efforts, and some other factors. You can try different hairstyles with goddess braids. From buns and updos to side-swept styles, there are endless possibilities.
How Long Does It Take to Install Goddess Braids?
As mentioned earlier, goddess box braids take at least 6 hours to install. This time could increase to even one day depending on several factors, like
- Your braid length
- Size of your head
- Speed of braiding
- Size of the sections
If you are installing goddess braids for the first time, allocate a big chunk of the day to the process. This will give your braider enough time not to rush braids and to come up with excellent results.
What Are the Best Ways to Prepare Your Hair for Goddess Braids?
Here’s a step-by-step guide to preparing your hair for goddess box braids in the best way possible:

Step 1: Shampoo Your Hair
Shampoo your hair with a paraben—and sulfate-free shampoo. Focus on scrubbing your scalp to remove dirt and product buildup. You won’t be able to wash your braids for weeks after installation, so ensure you put extra effort into it.
Step 2: Condition and Moisturize Your Hair
Once your hair is properly cleaned, apply a moisturizing conditioner to lock in moisture. Use your fingers or a wide tooth comb to distribute the product evenly and detangle hair. Leave the conditioner in for ten to fifteen minutes and rinse your hair thoroughly afterward. Now, apply a leave-in conditioner.
Step 3: Stretch Your Hair
Do you have a curly 3C or tightly coiled 4C hair type? Your braider might ask you to stretch your hair before braid installation. This will make braiding much easier. You can use different techniques for stretching out, like blow-drying, braiding, or the elastic band method. Choose one that best suits your availability and feasibility.
How to Remove Goddess Braids?
By now, you have explored the key basics of goddess braids; let’s now overview the removal process.
Prepare Tools and Hair: Gather all the essential tools, such as hair clips, scissors, a rat-tail comb, and a detangling spray. Also, ensure your hair is manageable before beginning the removal process.
Moisturize the Braids: Apply lightweight oil or spray a leave-in conditioner to moisturize the braids. This will help reduce friction and minimize hair breakage.
Cut the Extension Hair: If you have used extensions in your braids, carefully trim the synthetic or human hair just below where your natural hair ends.
Unravel the Braids: Now, use your fingers or a rat-tail comb to loosen up braids from the ends, moving towards the roots. Avoid excessive pulling that might create knots.
Release Your Natural Hair: When removing braids, gently separate your hair using your fingers. You may apply more moisturizer to ease detangling.
Wash and Condition: Once all the braids are removed, use a sulfate-free shampoo to cleanse your scalp and remove buildups. Follow up with a conditioner to ensure deep hydration.
Dry and Moisturize: Dry your hair a bit and apply a leave-in conditioner to seal in moisture and nourishing oil for optimal hair health.
Where to Get Best Quality Extensions for Goddess Box Braids?
If you are looking for a reliable brand to get premium extensions for goddess box braids, we recommend checking out LUVME Hair. This amazing store excels in offering diverse wig collections with various wig colors, textures, and lengths. From blonde bob and purple glueless wig to short, long wigs and more, you can find everything there. The best part about their wigs is the natural appearance accompanied by premium hair strand quality. Visit their website for more details.
You can use these codes for exclusive discounts on your LUVME Hair wig shopping:
- New Customer Special – Get 30% off your entire purchase with code: SNU30
- General Discount – Get 26% off with code: SMC26
- Spend & Save Deals:
- SMC19 – Save $19 on orders over $99
- SMC59 – Save $59 on orders over $219
- SMC100 – Save $100 on orders over $349
Conclusion
Goddess box braids are box braids with a modern twist. With them, you can achieve flexible styling possibilities and a softer, more bohemian look. All thanks to those loose, wavy strands incorporated throughout the braids. When installing these braids, ensure you prepare your hair before for a seamless braiding process. The same goes for the removal process; proper preparation helps prevent unnecessary breakage and keeps your natural hair healthy.
You can even try these braids with extensions, but ensure they are of premium quality and durable enough to last longer. LUVME Hair wigs tick all these boxes, so be sure to check them out. Hope you find this information worth reading. Stay tuned for more.
- 7 Lawn Care Hacks Every Homeowner Needs - June 8, 2026
- Can I Get The Best Dosa In Indiranagar Delivered To My Office By 9 AM? - June 5, 2026
- How to Choose the Best AI Anime Generator: Your Ultimate Guide - May 22, 2026